Sunday, February 19, 2017

Monday, February 13, 2017
Hadoop commands
Hadoop Commands
hadoop command [genericOptions] [commandOptions]
hadoop fs
Usage: java FsShell
[-ls <path>]
[-lsr <path>]
[-df [<path>]]
[-du <path>]
[-dus <path>]
[-count[-q] <path>]
[-mv <src> <dst>]
[-cp <src> <dst>]
[-rm [-skipTrash] <path>]
[-rmr [-skipTrash] <path>]
[-expunge]
[-put <localsrc> ... <dst>]
[-copyFromLocal <localsrc> ... <dst>]
[-moveFromLocal <localsrc> ... <dst>]
[-get [-ignoreCrc] [-crc] <src> <localdst>]
[-getmerge <src> <localdst> [addnl]]
[-cat <src>]
[-text <src>]
[-copyToLocal [-ignoreCrc] [-crc] <src> <localdst>]
[-moveToLocal [-crc] <src> <localdst>]
[-mkdir <path>]
[-setrep [-R] [-w] <rep> <path/file>]
[-touchz <path>]
[-test -[ezd] <path>]
[-stat [format] <path>]
[-tail [-f] <file>]
[-chmod [-R] <MODE[,MODE]... | OCTALMODE> PATH...]
[-chown [-R] [OWNER][:[GROUP]] PATH...]
[-chgrp [-R] GROUP PATH...]
[-help [cmd]]
hadoop fs -ls /
hadoop fs -ls /test1/
hadoop fs -cat /test1/foo.txt
hadoop fs -rm /test1/foo.txt
hadoop fs -mkdir /test6/
hadoop fs -put foo.txt /test6/
hadoop fs -put /etc/note.txt /test2/note_fs.txt
hadoop fs -get /user/satya/passwd ./
hadoop fs -setrep 5 -R /user/satya/tmp/
hadoop fsck /user/satya/tmp -files -blocks -locations
hadoop fs -chmod 1777 /tmp
hadoop fs -touch /user/satya/test/foo
hadoop fs -rmr /user/satya/test/foo
hadoop fs -touchz /user/satya/test/bar
hadoop fs -count -q /user/satya
hadoop -execute start-all.sh
hadoop job -list
hadoop job -kill jobID
hadoop job -list-attempt-ids jobID taskType taskState
hadoop job -kill-task taskAttemptId
hadoop namenode -format
hadoop jar <jar_file> wordcount <output_file>
hadoop jar /opt/hadoop/hadoop-examples-1.0.4.jar wordcount /out/wc_output
hadoop dfsadmin -report
hadoop dfsadmin -setSpaceQuota 10737418240 /user/esammer
hadoop dfsadmin -refreshNodes
hadoop dfsadmin -upgradeProgress status
hadoop dfsadmin -finalizeUpgrade
hadoop fsck
Usage: DFSck <path> [-move | -delete | -openforwrite] [-files [-blocks [-locations | -racks]]]
<path> -- start checking from this path
-move -- move corrupted files to /lost+found
-delete -- delete corrupted files
-files -- print out files being checked
-openforwrite -- print out files opened for write
-blocks -- print out block report
-locations -- print out locations for every block
-racks -- print out network topology for data-node locations
By default fsck ignores files opened for write, use -openforwrite to report such files. They are usually tagged CORRUPT or HEALTHY depending on their block allocation status.
hadoop fsck / -files -blocks -locations
hadoop fsck /user/satya -files -blocks -locations
hadoop distcp -- Distributed Copy (distcp)
distcp [OPTIONS] <srcurl>* <desturl>
OPTIONS:
-p[rbugp] Preserve status
r: replication number
b: block size
u: user
g: group
p: permission
-p alone is equivalent to -prbugp
-i Ignore failures
-log <logdir> Write logs to <logdir>
-m <num_maps> Maximum number of simultaneous copies
-overwrite Overwrite destination
-update Overwrite if src size different from dst size
-skipcrccheck Do not use CRC check to determine if src is different from dest. Relevant only if -update is specified
-f <urilist_uri> Use list at <urilist_uri> as src list
-filelimit <n> Limit the total number of files to be <= n
-sizelimit <n> Limit the total size to be <= n bytes
-delete Delete the files existing in the dst but not in src
-mapredSslConf <f> Filename of SSL configuration for mapper task
NOTE 1: if -overwrite or -update are set, each source URI is interpreted as an isomorphic update to an existing directory.
For example:
hadoop distcp -p -update "hdfs://A:8020/user/foo/bar" "hdfs://B:8020/user/foo/baz"
would update all descendants of 'baz' also in 'bar'; it would *not* update /user/foo/baz/bar
NOTE 2: The parameter <n> in -filelimit and -sizelimit can be specified with symbolic representation. For examples,
1230k = 1230 * 1024 = 1259520
891g = 891 * 1024^3 = 956703965184
hadoop distcp hdfs://A:8020/path/one hdfs://B:8020/path/two
hadoop distcp /path/one /path/two
Tuesday, December 13, 2016
Thursday, November 24, 2016
First we have to create an App on the Facebook platform. We will use
this app to connect to the Facebook API. This way you can manage your
connections very good but it also has some disadvantages. Different than
in version 1 of the API you can now just get information of the friends
who are also using the app. This creates big problems as you can´t
create a friend network with all you friends anymore.
To create a new app go to https://developers.facebook.com

Click on “Apps” and choose “Add a New App“. In the next window choose “Website” and give your app a fancy name.
After clicking on “Create a New App ID“, choose a category for your app in the next window and apply the changes with “Create App ID“.
You can then click on “Skip Quick Start” to get directly to the settings of your app.

Welcome to your first own Facebook app!
Ok now we need to connect our R session with our test app and
authenticate it to our Facebook Profile for Data Mining. Rfacebook
offers a very easy function for that.
Just copy your app id and your app secret from your app settings on the Facebook developer page.
The console will then print you the message:

Copy the URL and go to the settings of your Facebook app. Click on the settings tab on the left side and then choose “+ Add Platform“.
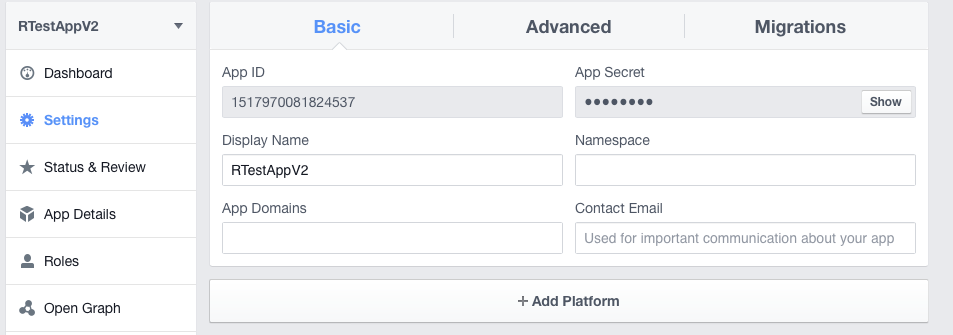
Then add the URL in the field “Site URL” and save the changes.
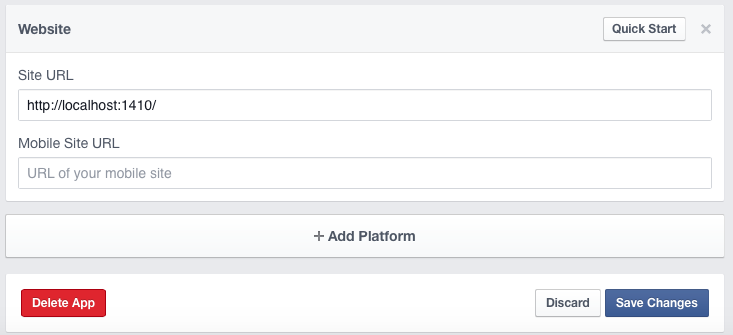
Go back to your R session and hit enter. Then a browser window should open you have to allow the app to access your Facebook account.
If everything worked the browser should show the message

And your R console will confirm it with
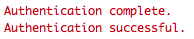
You can then save your fb_oauth object and use it for the next time.
As I mentioned before because of Facebook´s new API policies the information you can get is very limited compared to the amount you were able to download with apps using API 1.
So I will just show you now how to get your own personal information but other posts will follow with new use-cases of the new API version.
The getUsers function returns public information about one or more Facebook user. If we use “me” as the username argument, it will return our own profile info.
Now we saved our own public information in the variable „me“ and you can take a look at it.
An advantage of the new API version is that you can get more than 100 likes. You can get the things you liked with:
=====================================================================================
=========================================face-book ======================================================================================
install.packages("devtools")
library(devtools)
library(httr)
set_config(
use_proxy(url="proxy.company.co.in", port=8080, username="user@company.co.in",password="password@4321")
)
install_github("Rfacebook", "pablobarbera", subdir="Rfacebook")
require("Rfacebook")
fb_oauth <- fbOAuth(app_id="331", app_secret="f82e0ffc352f4b30c16686ccf",extended_permissions = TRUE)
save(fb_oauth, file="fb_oauth")
load("fb_oauth")
axis_page <- getPage(page="axisbank", token=fb_oauth)
icici_page <- getPage(page="icicibank", token=fb_oauth)
fb_page <- getPage(page="facebook", token=fb_oauth)
token <- "EAACEdEose0cBA"
my_friends <- getFriends(token=token, simplify=TRUE)
To create a new app go to https://developers.facebook.com
Click on “Apps” and choose “Add a New App“. In the next window choose “Website” and give your app a fancy name.
After clicking on “Create a New App ID“, choose a category for your app in the next window and apply the changes with “Create App ID“.
You can then click on “Skip Quick Start” to get directly to the settings of your app.
Welcome to your first own Facebook app!
R
First we need to install the packages devtools and Rfacebook from github as this is currently the most recent version.Just copy your app id and your app secret from your app settings on the Facebook developer page.
Copy the URL and go to the settings of your Facebook app. Click on the settings tab on the left side and then choose “+ Add Platform“.
Then add the URL in the field “Site URL” and save the changes.
Go back to your R session and hit enter. Then a browser window should open you have to allow the app to access your Facebook account.
If everything worked the browser should show the message
And your R console will confirm it with
You can then save your fb_oauth object and use it for the next time.
Analyze Facebook with R!
Now we connected everything and have access to Facebook. We will start with getting our own profile information.As I mentioned before because of Facebook´s new API policies the information you can get is very limited compared to the amount you were able to download with apps using API 1.
So I will just show you now how to get your own personal information but other posts will follow with new use-cases of the new API version.
The getUsers function returns public information about one or more Facebook user. If we use “me” as the username argument, it will return our own profile info.
An advantage of the new API version is that you can get more than 100 likes. You can get the things you liked with:
=========================================face-book ======================================================================================
install.packages("devtools")
library(devtools)
library(httr)
set_config(
use_proxy(url="proxy.company.co.in", port=8080, username="user@company.co.in",password="password@4321")
)
install_github("Rfacebook", "pablobarbera", subdir="Rfacebook")
require("Rfacebook")
fb_oauth <- fbOAuth(app_id="331", app_secret="f82e0ffc352f4b30c16686ccf",extended_permissions = TRUE)
save(fb_oauth, file="fb_oauth")
load("fb_oauth")
axis_page <- getPage(page="axisbank", token=fb_oauth)
icici_page <- getPage(page="icicibank", token=fb_oauth)
fb_page <- getPage(page="facebook", token=fb_oauth)
token <- "EAACEdEose0cBA"
my_friends <- getFriends(token=token, simplify=TRUE)
Wednesday, November 23, 2016
Spark submit with SBT
Spark submit with SBT
This recipe assumes sbt is installed and you have already gone over mysql with Spark recipe.I am a big fan of Spark Shell. Biggest proof is Spark Cookbook which has all recipes in the form of collection of single commands on Spark Shell. It makes it easy to understand and run and see what exact effect each command is having.
On similar lines, I have a big fan of Maven. Maven brought two disruptive changes to the build world which are going to stay forever and they are
- Declarative dependency management
- Convention over configuration
spark-shell is not enough and we have to use spark-submit.
spark-submit expects the application logic to be bundled in a jar file.
Now creating this jar file using maven is a lot of work especially for
super simple project and this is where simplicity of Sbt comes into the
picture. In this recipe we’ll build and deploy a simple application using Sbt.
Create directory people and src/main/scala in that.
$ mkdir -p people/src/main/scala |
import org.apache.spark._ import org.apache.spark.sql._ object Person extends App { val sc = new SparkContext val sqlContext = new SQLContext(sc) val url="jdbc:mysql://localhost:3306/hadoopdb" val prop = new java.util.Properties prop.setProperty("user","hduser") prop.setProperty("password","vipassana") val people = sqlContext.read.jdbc(url,"person",prop) people.collect.foreach(println) } |
$ echo "libraryDependencies += \"org.apache.spark\" %% \"spark-sql\" % \"1.4.1\"" >> build.sbt |
$ sbt clean package
|
$ spark-submit --driver-class-path /home/hduser/thirdparty/mysql.jar target/scala-2.10/people*.jar |
Now let’s do the same using cluster deploy mode, in this case we have to go to http://spark-master:8080 to see the results.
$ spark-submit --master spark://localhost:7077 --deploy-mode cluster --driver-class-path /home/hduser/thirdparty/mysql.jar --jars /home/hduser/thirdparty/mysql.jar target/scala-2.10/people*.jar |
Tuesday, November 8, 2016
HBase shell commands
HBase shell commands
HBase shell commands are mainly categorized into 6 parts
1) General HBase shell commands
| status | Show cluster status. Can be ‘summary’, ‘simple’, or ‘detailed’. The default is ‘summary’. hbase> status hbase> status ‘simple’ hbase> status ‘summary’ hbase> status ‘detailed’ |
| version | Output this HBase versionUsage: hbase> version |
| whoami | Show the current hbase user.Usage: hbase> whoami |
| alter | Alter column family schema; pass table name and a dictionary specifying new column family schema. Dictionaries are described on the main help command output. Dictionary must include name of column family to alter.For example, to change or add the ‘f1’ column family in table ‘t1’ from current value to keep a maximum of 5 cell VERSIONS, do: hbase> alter ‘t1’, NAME => ‘f1’, VERSIONS => 5 You can operate on several column families: hbase> alter ‘t1’, ‘f1’, {NAME => ‘f2’, IN_MEMORY => true}, {NAME => ‘f3’, VERSIONS => 5} To delete the ‘f1’ column family in table ‘t1’, use one of:hbase> alter ‘t1’, NAME => ‘f1’, METHOD => ‘delete’ hbase> alter ‘t1’, ‘delete’ => ‘f1’ You can also change table-scope attributes like MAX_FILESIZE, READONLY, MEMSTORE_FLUSHSIZE, DEFERRED_LOG_FLUSH, etc. These can be put at the end; for example, to change the max size of a region to 128MB, do: hbase> alter ‘t1’, MAX_FILESIZE => ‘134217728’ You can add a table coprocessor by setting a table coprocessor attribute: hbase> alter ‘t1’, ‘coprocessor’=>’hdfs:///foo.jar|com.foo.FooRegionObserver|1001|arg1=1,arg2=2’ Since you can have multiple coprocessors configured for a table, a sequence number will be automatically appended to the attribute name to uniquely identify it. The coprocessor attribute must match the pattern below in order for the framework to understand how to load the coprocessor classes: [coprocessor jar file location] | class name | [priority] | [arguments] You can also set configuration settings specific to this table or column family: hbase> alter ‘t1’, CONFIGURATION => {‘hbase.hregion.scan.loadColumnFamiliesOnDemand’ => ‘true’} hbase> alter ‘t1’, {NAME => ‘f2’, CONFIGURATION => {‘hbase.hstore.blockingStoreFiles’ => ’10’}} You can also remove a table-scope attribute: hbase> alter ‘t1’, METHOD => ‘table_att_unset’, NAME => ‘MAX_FILESIZE’ hbase> alter ‘t1’, METHOD => ‘table_att_unset’, NAME => ‘coprocessor$1’ There could be more than one alteration in one command: hbase> alter ‘t1’, { NAME => ‘f1’, VERSIONS => 3 }, { MAX_FILESIZE => ‘134217728’ }, { METHOD => ‘delete’, NAME => ‘f2’ }, OWNER => ‘johndoe’, METADATA => { ‘mykey’ => ‘myvalue’ } |
| create | Create table; pass table name, a dictionary of specifications per column family, and optionally a dictionary of table configuration. hbase> create ‘t1’, {NAME => ‘f1’, VERSIONS => 5} hbase> create ‘t1’, {NAME => ‘f1’}, {NAME => ‘f2’}, {NAME => ‘f3’} hbase> # The above in shorthand would be the following: hbase> create ‘t1’, ‘f1’, ‘f2’, ‘f3’ hbase> create ‘t1’, {NAME => ‘f1’, VERSIONS => 1, TTL => 2592000, BLOCKCACHE => true} hbase> create ‘t1’, {NAME => ‘f1’, CONFIGURATION => {‘hbase.hstore.blockingStoreFiles’ => ’10’}} Table configuration options can be put at the end. |
| describe | Describe the named table. hbase> describe ‘t1’ |
| disable | Start disable of named table hbase> disable ‘t1’ |
| disable_all | Disable all of tables matching the given regex hbase> disable_all ‘t.*’ |
| is_disabled | verifies Is named table disabled hbase> is_disabled ‘t1’ |
| drop | Drop the named table. Table must first be disabled hbase> drop ‘t1’ |
| drop_all | Drop all of the tables matching the given regex hbase> drop_all ‘t.*’ |
| enable | Start enable of named table hbase> enable ‘t1’ |
| enable_all | Enable all of the tables matching the given regex hbase> enable_all ‘t.*’ |
| is_enabled | verifies Is named table enabled hbase> is_enabled ‘t1’ |
| exists | Does the named table exist hbase> exists ‘t1’ |
| list | List all tables in hbase. Optional regular expression parameter could be used to filter the output hbase> list hbase> list ‘abc.*’ |
| show_filters | Show all the filters in hbase. hbase> show_filters |
| alter_status | Get the status of the alter command. Indicates the number of regions
of the table that have received the updated schema Pass table name. hbase> alter_status ‘t1’ |
| alter_async | Alter column family schema, does not wait for all regions to receive the schema changes. Pass table name and a dictionary specifying new column family schema. Dictionaries are described on the main help command output. Dictionary must include name of column family to alter. To change or add the ‘f1’ column family in table ‘t1’ from defaults to instead keep a maximum of 5 cell VERSIONS, do:hbase> alter_async ‘t1’, NAME => ‘f1’, VERSIONS => 5To delete the ‘f1’ column family in table ‘t1’, do: hbase> alter_async ‘t1’, NAME => ‘f1’, METHOD => ‘delete’or a shorter version:hbase> alter_async ‘t1’, ‘delete’ => ‘f1’ You can also change table-scope attributes like MAX_FILESIZE MEMSTORE_FLUSHSIZE, READONLY, and DEFERRED_LOG_FLUSH. For example, to change the max size of a family to 128MB, do: hbase> alter ‘t1’, METHOD => ‘table_att’, MAX_FILESIZE => ‘134217728’ There could be more than one alteration in one command: hbase> alter ‘t1’, {NAME => ‘f1’}, {NAME => ‘f2’, METHOD => ‘delete’} To check if all the regions have been updated, use alter_status <table_name> |
| count | Count the number of rows in a table. Return value is the number of rows. This operation may take a LONG time (Run ‘$HADOOP_HOME/bin/hadoop jar hbase.jar rowcount’ to run a counting mapreduce job). Current count is shown every 1000 rows by default. Count interval may be optionally specified. Scan caching is enabled on count scans by default. Default cache size is 10 rows. If your rows are small in size, you may want to increase this parameter. Examples:hbase> count ‘t1’ hbase> count ‘t1’, INTERVAL => 100000 hbase> count ‘t1’, CACHE => 1000 hbase> count ‘t1’, INTERVAL => 10, CACHE => 1000 The same commands also can be run on a table reference. Suppose you had a reference t to table ‘t1’, the corresponding commands would be:hbase> t.count hbase> t.count INTERVAL => 100000 hbase> t.count CACHE => 1000 hbase> t.count INTERVAL => 10, CACHE => 1000 |
| delete | Put a delete cell value at specified table/row/column and optionally timestamp coordinates. Deletes must match the deleted cell’s coordinates exactly. When scanning, a delete cell suppresses older versions. To delete a cell from ‘t1’ at row ‘r1’ under column ‘c1’ marked with the time ‘ts1’, do: hbase> delete ‘t1’, ‘r1’, ‘c1’, ts1 The same command can also be run on a table reference. Suppose you had a reference t to table ‘t1’, the corresponding command would be:hbase> t.delete ‘r1’, ‘c1’, ts1 |
| deleteall | Delete all cells in a given row; pass a table name, row, and optionally a column and timestamp. Examples:hbase> deleteall ‘t1’, ‘r1’ hbase> deleteall ‘t1’, ‘r1’, ‘c1’ hbase> deleteall ‘t1’, ‘r1’, ‘c1’, ts1 The same commands also can be run on a table reference. Suppose you had a reference t to table ‘t1’, the corresponding command would be:hbase> t.deleteall ‘r1’ hbase> t.deleteall ‘r1’, ‘c1’ hbase> t.deleteall ‘r1’, ‘c1’, ts1 |
| get | Get row or cell contents; pass table name, row, and optionally a dictionary of column(s), timestamp, timerange and versions. Examples: hbase> get ‘t1’, ‘r1’ hbase> get ‘t1’, ‘r1’, {TIMERANGE => [ts1, ts2]} hbase> get ‘t1’, ‘r1’, {COLUMN => ‘c1’} hbase> get ‘t1’, ‘r1’, {COLUMN => [‘c1’, ‘c2’, ‘c3’]} hbase> get ‘t1’, ‘r1’, {COLUMN => ‘c1’, TIMESTAMP => ts1} hbase> get ‘t1’, ‘r1’, {COLUMN => ‘c1’, TIMERANGE => [ts1, ts2], VERSIONS => 4} hbase> get ‘t1’, ‘r1’, {COLUMN => ‘c1’, TIMESTAMP => ts1, VERSIONS => 4} hbase> get ‘t1’, ‘r1’, {FILTER => “ValueFilter(=, ‘binary:abc’)”} hbase> get ‘t1’, ‘r1’, ‘c1’ hbase> get ‘t1’, ‘r1’, ‘c1’, ‘c2’ hbase> get ‘t1’, ‘r1’, [‘c1’, ‘c2’] Besides the default ‘toStringBinary’ format, ‘get’ also supports custom formatting by column. A user can define a FORMATTER by adding it to the column name in the get specification. The FORMATTER can be stipulated:1. either as a org.apache.hadoop.hbase.util.Bytes method name (e.g, toInt, toString) 2. or as a custom class followed by method name: e.g. ‘c(MyFormatterClass).format’.Example formatting cf:qualifier1 and cf:qualifier2 both as Integers: hbase> get ‘t1’, ‘r1’ {COLUMN => [‘cf:qualifier1:toInt’, ‘cf:qualifier2:c(org.apache.hadoop.hbase.util.Bytes).toInt’] } Note that you can specify a FORMATTER by column only (cf:qualifer). You cannot specify a FORMATTER for all columns of a column family.The same commands also can be run on a reference to a table (obtained via get_table or create_table). Suppose you had a reference t to table ‘t1’, the corresponding commands would be: hbase> t.get ‘r1’ hbase> t.get ‘r1’, {TIMERANGE => [ts1, ts2]} hbase> t.get ‘r1’, {COLUMN => ‘c1’} hbase> t.get ‘r1’, {COLUMN => [‘c1’, ‘c2’, ‘c3’]} hbase> t.get ‘r1’, {COLUMN => ‘c1’, TIMESTAMP => ts1} hbase> t.get ‘r1’, {COLUMN => ‘c1’, TIMERANGE => [ts1, ts2], VERSIONS => 4} hbase> t.get ‘r1’, {COLUMN => ‘c1’, TIMESTAMP => ts1, VERSIONS => 4} hbase> t.get ‘r1’, {FILTER => “ValueFilter(=, ‘binary:abc’)”} hbase> t.get ‘r1’, ‘c1’ hbase> t.get ‘r1’, ‘c1’, ‘c2’ hbase> t.get ‘r1’, [‘c1’, ‘c2’] |
| get_counter | Return a counter cell value at specified table/row/column coordinates. A cell cell should be managed with atomic increment function oh HBase and the data should be binary encoded. Example: hbase> get_counter ‘t1’, ‘r1’, ‘c1’ The same commands also can be run on a table reference. Suppose you had a reference t to table ‘t1’, the corresponding command would be: hbase> t.get_counter ‘r1’, ‘c1’ |
| incr | Increments a cell ‘value’ at specified table/row/column coordinates. To increment a cell value in table ‘t1’ at row ‘r1’ under column ‘c1’ by 1 (can be omitted) or 10 do: hbase> incr ‘t1’, ‘r1’, ‘c1’ hbase> incr ‘t1’, ‘r1’, ‘c1’, 1 hbase> incr ‘t1’, ‘r1’, ‘c1’, 10 The same commands also can be run on a table reference. Suppose you had a reference t to table ‘t1’, the corresponding command would be:hbase> t.incr ‘r1’, ‘c1’ hbase> t.incr ‘r1’, ‘c1’, 1 hbase> t.incr ‘r1’, ‘c1’, 10 |
| put | Put a cell ‘value’ at specified table/row/column and optionally timestamp coordinates. To put a cell value into table ‘t1’ at row ‘r1’ under column ‘c1’ marked with the time ‘ts1’, do: hbase> put ‘t1’, ‘r1’, ‘c1’, ‘value’, ts1 The same commands also can be run on a table reference. Suppose you had a reference t to table ‘t1’, the corresponding command would be: hbase> t.put ‘r1’, ‘c1’, ‘value’, ts1 |
| scan | Scan a table; pass table name and optionally a dictionary of scanner specifications. Scanner specifications may include one or more of: TIMERANGE, FILTER, LIMIT, STARTROW, STOPROW, TIMESTAMP, MAXLENGTH, or COLUMNS, CACHEIf no columns are specified, all columns will be scanned. To scan all members of a column family, leave the qualifier empty as in ‘col_family:’.The filter can be specified in two ways: 1. Using a filterString – more information on this is available in the Filter Language document attached to the HBASE-4176 JIRA 2. Using the entire package name of the filter.Some examples:hbase> scan ‘.META.’ hbase> scan ‘.META.’, {COLUMNS => ‘info:regioninfo’} hbase> scan ‘t1’, {COLUMNS => [‘c1’, ‘c2’], LIMIT => 10, STARTROW => ‘xyz’} hbase> scan ‘t1’, {COLUMNS => ‘c1’, TIMERANGE => [1303668804, 1303668904]} hbase> scan ‘t1’, {FILTER => “(PrefixFilter (‘row2’) AND (QualifierFilter (>=, ‘binary:xyz’))) AND (TimestampsFilter ( 123, 456))”} hbase> scan ‘t1’, {FILTER => org.apache.hadoop.hbase.filter.ColumnPaginationFilter.new(1, 0)} For experts, there is an additional option — CACHE_BLOCKS — which switches block caching for the scanner on (true) or off (false). By default it is enabled. Examples:hbase> scan ‘t1’, {COLUMNS => [‘c1’, ‘c2’], CACHE_BLOCKS => false} Also for experts, there is an advanced option — RAW — which instructs the scanner to return all cells (including delete markers and uncollected deleted cells). This option cannot be combined with requesting specific COLUMNS. Disabled by default. Example: hbase> scan ‘t1’, {RAW => true, VERSIONS => 10} Besides the default ‘toStringBinary’ format, ‘scan’ supports custom formatting by column. A user can define a FORMATTER by adding it to the column name in the scan specification. The FORMATTER can be stipulated: 1. either as a org.apache.hadoop.hbase.util.Bytes method name (e.g, toInt, toString) 2. or as a custom class followed by method name: e.g. ‘c(MyFormatterClass).format’. Example formatting cf:qualifier1 and cf:qualifier2 both as Integers: hbase> scan ‘t1’, {COLUMNS => [‘cf:qualifier1:toInt’, ‘cf:qualifier2:c(org.apache.hadoop.hbase.util.Bytes).toInt’] } Note that you can specify a FORMATTER by column only (cf:qualifer). You cannot specify a FORMATTER for all columns of a column family. Scan can also be used directly from a table, by first getting a reference to a table, like such: hbase> t = get_table ‘t’ hbase> t.scan Note in the above situation, you can still provide all the filtering, columns, options, etc as described above. |
| truncate | Disables, drops and recreates the specified table. Examples: hbase>truncate ‘t1’ |
| assign | Assign a region. Use with caution. If region already assigned, this command will do a force reassign. For experts only. Examples: hbase> assign ‘REGION_NAME’ |
| balancer | Trigger the cluster balancer. Returns true if balancer ran and was able to tell the region servers to unassign all the regions to balance (the re-assignment itself is async). Otherwise false (Will not run if regions in transition). Examples: hbase> balancer |
| balance_switch | Enable/Disable balancer. Returns previous balancer state. Examples: hbase> balance_switch true hbase> balance_switch false |
| close_region | Close a single region. Ask the master to close a region out on the cluster or if ‘SERVER_NAME’ is supplied, ask the designated hosting regionserver to close the region directly. Closing a region, the master expects ‘REGIONNAME’ to be a fully qualified region name. When asking the hosting regionserver to directly close a region, you pass the regions’ encoded name only. A region name looks like this:TestTable,0094429456,1289497600452.527db22f95c8a9e0116f0cc13c680396.The trailing period is part of the regionserver name. A region’s encoded name is the hash at the end of a region name; e.g. 527db22f95c8a9e0116f0cc13c680396 (without the period). A ‘SERVER_NAME’ is its host, port plus startcode. For example: host187.example.com,60020,1289493121758 (find servername in master ui or when you do detailed status in shell). This command will end up running close on the region hosting regionserver. The close is done without the master’s involvement (It will not know of the close). Once closed, region will stay closed. Use assign to reopen/reassign. Use unassign or move to assign the region elsewhere on cluster. Use with caution. For experts only. Examples:hbase> close_region ‘REGIONNAME’ hbase> close_region ‘REGIONNAME’, ‘SERVER_NAME’ |
| compact | Compact all regions in passed table or pass a region row to compact an individual region. You can also compact a single column family within a region. Examples: Compact all regions in a table: hbase> compact ‘t1’ Compact an entire region: hbase> compact ‘r1’ Compact only a column family within a region: hbase> compact ‘r1’, ‘c1’ Compact a column family within a table: hbase> compact ‘t1’, ‘c1’ |
| flush | Flush all regions in passed table or pass a region row to flush an individual region. For example:hbase> flush ‘TABLENAME’ hbase> flush ‘REGIONNAME’ |
| major_compact | Run major compaction on passed table or pass a region row to major compact an individual region. To compact a single column family within a region specify the region name followed by the column family name. Examples: Compact all regions in a table: hbase> major_compact ‘t1’ Compact an entire region: hbase> major_compact ‘r1’ Compact a single column family within a region: hbase> major_compact ‘r1’, ‘c1’ Compact a single column family within a table: hbase> major_compact ‘t1’, ‘c1’ |
| move | Move a region. Optionally specify target regionserver else we choose one at random. NOTE: You pass the encoded region name, not the region name so this command is a little different to the others. The encoded region name is the hash suffix on region names: e.g. if the region name were TestTable,0094429456,1289497600452.527db22f95c8a9e0116f0cc13c680396. then the encoded region name portion is 527db22f95c8a9e0116f0cc13c680396 A server name is its host, port plus startcode. For example: host187.example.com,60020,1289493121758 Examples:hbase> move ‘ENCODED_REGIONNAME’ hbase> move ‘ENCODED_REGIONNAME’, ‘SERVER_NAME’ |
| split | Split entire table or pass a region to split individual region. With the second parameter, you can specify an explicit split key for the region. Examples: split ‘tableName’ split ‘regionName’ # format: ‘tableName,startKey,id’ split ‘tableName’, ‘splitKey’ split ‘regionName’, ‘splitKey’ |
| unassign | Unassign a region. Unassign will close region in current location and then reopen it again. Pass ‘true’ to force the unassignment (‘force’ will clear all in-memory state in master before the reassign. If results in double assignment use hbck -fix to resolve. To be used by experts). Use with caution. For expert use only. Examples:hbase> unassign ‘REGIONNAME’ hbase> unassign ‘REGIONNAME’, true |
| hlog_roll | Roll the log writer. That is, start writing log messages to a new file. The name of the regionserver should be given as the parameter. A ‘server_name’ is the host, port plus startcode of a regionserver. For example: host187.example.com,60020,1289493121758 (find servername in master ui or when you do detailed status in shell) hbase>hlog_roll |
| zk_dump | Dump status of HBase cluster as seen by ZooKeeper. Example: hbase>zk_dump |
| add_peer | Add a peer cluster to replicate to, the id must be a short and the cluster key is composed like this: hbase.zookeeper.quorum:hbase.zookeeper.property.clientPort:zookeeper.znode.parent This gives a full path for HBase to connect to another cluster. Examples:hbase> add_peer ‘1’, “server1.cie.com:2181:/hbase” hbase> add_peer ‘2’, “zk1,zk2,zk3:2182:/hbase-prod” |
| remove_peer | Stops the specified replication stream and deletes all the meta information kept about it. Examples: hbase> remove_peer ‘1’ |
| list_peers | List all replication peer clusters. hbase> list_peers |
| enable_peer | Restarts the replication to the specified peer cluster, continuing from where it was disabled.Examples: hbase> enable_peer ‘1’ |
| disable_peer | Stops the replication stream to the specified cluster, but still keeps track of new edits to replicate.Examples: hbase> disable_peer ‘1’ |
| start_replication | Restarts all the replication features. The state in which each stream starts in is undetermined. WARNING: start/stop replication is only meant to be used in critical load situations. Examples: hbase> start_replication |
| stop_replication | Stops all the replication features. The state in which each stream stops in is undetermined. WARNING: start/stop replication is only meant to be used in critical load situations. Examples: hbase> stop_replication |
| grant | Grant users specific rights. Syntax : grantpermissions is either zero or more letters from the set “RWXCA”. READ(‘R’), WRITE(‘W’), EXEC(‘X’), CREATE(‘C’), ADMIN(‘A’)For example:hbase> grant ‘bobsmith’, ‘RWXCA’ hbase> grant ‘bobsmith’, ‘RW’, ‘t1’, ‘f1’, ‘col1’ |
| revoke | Revoke a user’s access rights. Syntax : revoke For example: hbase> revoke ‘bobsmith’, ‘t1’, ‘f1’, ‘col1’ |
| user_permission | Show all permissions for the particular user. Syntax : user_permission For example:hbase> user_permission hbase> user_permission ‘table1’ |
Monday, October 17, 2016
spark Streaming word count
scala> import org.apache.spark.streaming._
import org.apache.spark.streaming._
scala> val stc = new StreamingContext(sc, Seconds(5))
stc: org.apache.spark.streaming.StreamingContext = org.apache.spark.streaming.StreamingContext@18f2d752
scala> val lines = stc.socketTextStream("localhost", 9999)
lines: org.apache.spark.streaming.dstream.ReceiverInputDStream[String] = org.apache.spark.streaming.dstream.SocketInputDStream@346995e1
scala> val words = lines.flatMap(_.split(" "))
words: org.apache.spark.streaming.dstream.DStream[String] = org.apache.spark.streaming.dstream.FlatMappedDStream@27058c08
scala> val pairs = words.map(word => (word, 1))
pairs: org.apache.spark.streaming.dstream.DStream[(String, Int)] = org.apache.spark.streaming.dstream.MappedDStream@de5d972
scala> val wordCounts = pairs.reduceByKey(_ + _)
wordCounts: org.apache.spark.streaming.dstream.DStream[(String, Int)] = org.apache.spark.streaming.dstream.ShuffledDStream@409f70ca
scala> wordCounts.print()
scala> wordCounts.foreachRDD { rdd => rdd.foreach(print) }
scala> stc.start()
scala> stc.awaitTermination()
new terminal
[cloudera@quickstart ~]$ nc -lk 9999
hi
hello hello
import org.apache.spark.streaming._
scala> val stc = new StreamingContext(sc, Seconds(5))
stc: org.apache.spark.streaming.StreamingContext = org.apache.spark.streaming.StreamingContext@18f2d752
scala> val lines = stc.socketTextStream("localhost", 9999)
lines: org.apache.spark.streaming.dstream.ReceiverInputDStream[String] = org.apache.spark.streaming.dstream.SocketInputDStream@346995e1
scala> val words = lines.flatMap(_.split(" "))
words: org.apache.spark.streaming.dstream.DStream[String] = org.apache.spark.streaming.dstream.FlatMappedDStream@27058c08
scala> val pairs = words.map(word => (word, 1))
pairs: org.apache.spark.streaming.dstream.DStream[(String, Int)] = org.apache.spark.streaming.dstream.MappedDStream@de5d972
scala> val wordCounts = pairs.reduceByKey(_ + _)
wordCounts: org.apache.spark.streaming.dstream.DStream[(String, Int)] = org.apache.spark.streaming.dstream.ShuffledDStream@409f70ca
scala> wordCounts.print()
scala> wordCounts.foreachRDD { rdd => rdd.foreach(print) }
scala> stc.start()
scala> stc.awaitTermination()
new terminal
[cloudera@quickstart ~]$ nc -lk 9999
hi
hello hello
Subscribe to:
Posts (Atom)